The idea of this article is to give you some tips on how to weigh especially bulky or big items, how to categorize them and how to make a packlist. It should help you to determine how heavy your pack is, and gives you the opportunity to easily see where possible weight savings can be made.
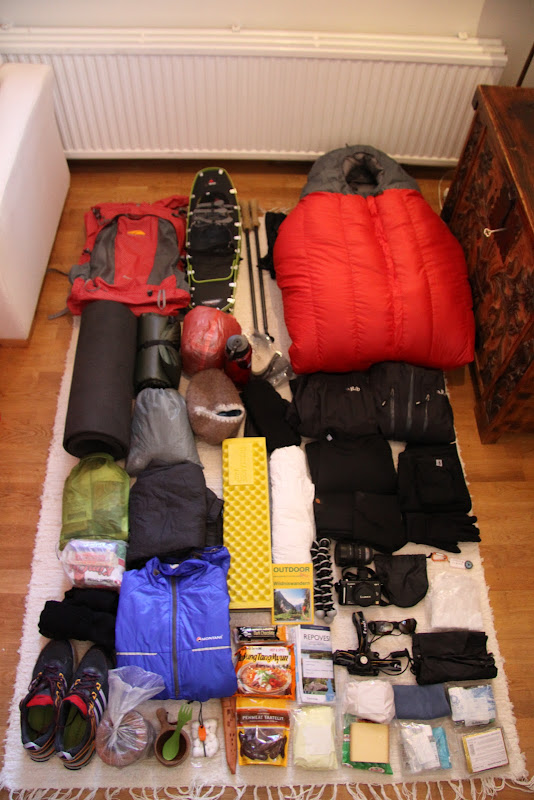
All the gear for my Repovesi trip.
The first thing you should do once you decide to lighten up your backpack, is to weigh your gear. A digital scale which can give you the weight in gram is what I use, those who use ounces and pounds likely will use a scale with these measurements. Either way, a digital scale with as small increments as possible should be your first investment when you decide to lighten up. I have one which can weigh stuff up to 5 kg in 1 g increments, and has a tare function. The tare is important, as in that way you can use something to balance big items on the scale which otherwise would touch the table and thus might not represent the accurate weight. Tare usually functions so that you put your scale on, wait till it shows it is ready, place the bowl or other item on it and hit tare, now its back to zero and you can start weighting your bulky gear. Check the photos to see what I mean.

MSR Lightning Ascent snowshoes on the scale, with the help of a bowl and tare function the exact weight can be determined.

The GoLite Pinnacle has a lot of straps and is bulky, again with the help of the bowl its easy to measure the weight.

Also small items, like these MLD snow gaiters, can be easily weigh.
As you can see, I document the weight on a piece of paper, if I'd be smart I would take my laptop right next to it and save writing it twice. There's a plethora of gear calculators out there, but the majority of folks seem to use the good old spreadsheet to list and calculate their gear weights. And why not, its easy, and with the help of Google docs you even can store it online and have it open for other people to see and comment on. That's what I did with my Repovesi packlist, and you can view it here. There's also GearGrams if spreadsheets and formulas are not your métier, but I haven't tried that out.
I sort the gear in various categories, that makes it easier to oversee. There's packing, shelter & sleeping, kitchen, clothing, various and consumables. I also list my camera kit under its own category, but you could just put it under various if you want to make it simpler. At the end I calculate the total of everything, and then sort by consumables, pack weight excluding consumables and with consumables and what I wear. That gives me the information I need to know, and leaves nothing out.
So, with the help of this spreadsheet I now know exactly what I am carrying - it is also a useful checklist to see if everything is packed when leaving, and after a trip I can open the spreadsheet and see what actually got used, what didn't, if I took too much food with me or if it was too less or just right, and where potential weight savings could be achieved. For me on this trip, I carry a few luxury items with me, like my woolen camp shoes, an extra piece of Z Lite as camp seat, a nice piece of cheese and reindeer ham and a book. I could save some weight by taking a lighter headlamp, leave the Nalgene at home and make a cozy for the Platy, combine sleeping system with camp gear, but I'd need a VBL suit for that and as I don't have one yet that's currently not an option. And I am expecting temperatures of -14°C so I'd rather have a good, warm sleeping bag with me, and sufficient isolation to the ground.
I hope this gave you some ideas on how to weigh and list your gear before you go around shopping for new equipment. Listing things up with their weight helps you to make informed decisions where the easiest and best weight savings can be made, before going on a shopping spree =)
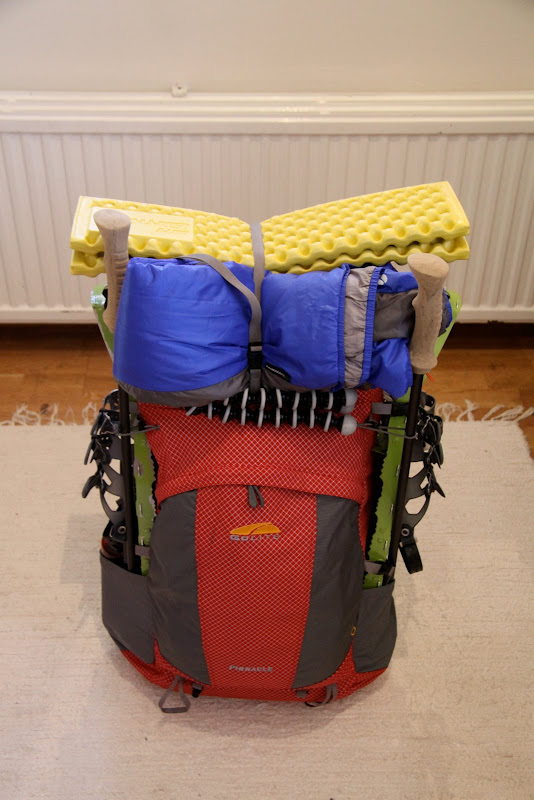
Packed and ready to hike!
All the gear for my Repovesi trip.
The first thing you should do once you decide to lighten up your backpack, is to weigh your gear. A digital scale which can give you the weight in gram is what I use, those who use ounces and pounds likely will use a scale with these measurements. Either way, a digital scale with as small increments as possible should be your first investment when you decide to lighten up. I have one which can weigh stuff up to 5 kg in 1 g increments, and has a tare function. The tare is important, as in that way you can use something to balance big items on the scale which otherwise would touch the table and thus might not represent the accurate weight. Tare usually functions so that you put your scale on, wait till it shows it is ready, place the bowl or other item on it and hit tare, now its back to zero and you can start weighting your bulky gear. Check the photos to see what I mean.
MSR Lightning Ascent snowshoes on the scale, with the help of a bowl and tare function the exact weight can be determined.
The GoLite Pinnacle has a lot of straps and is bulky, again with the help of the bowl its easy to measure the weight.
Also small items, like these MLD snow gaiters, can be easily weigh.
As you can see, I document the weight on a piece of paper, if I'd be smart I would take my laptop right next to it and save writing it twice. There's a plethora of gear calculators out there, but the majority of folks seem to use the good old spreadsheet to list and calculate their gear weights. And why not, its easy, and with the help of Google docs you even can store it online and have it open for other people to see and comment on. That's what I did with my Repovesi packlist, and you can view it here. There's also GearGrams if spreadsheets and formulas are not your métier, but I haven't tried that out.
I sort the gear in various categories, that makes it easier to oversee. There's packing, shelter & sleeping, kitchen, clothing, various and consumables. I also list my camera kit under its own category, but you could just put it under various if you want to make it simpler. At the end I calculate the total of everything, and then sort by consumables, pack weight excluding consumables and with consumables and what I wear. That gives me the information I need to know, and leaves nothing out.
So, with the help of this spreadsheet I now know exactly what I am carrying - it is also a useful checklist to see if everything is packed when leaving, and after a trip I can open the spreadsheet and see what actually got used, what didn't, if I took too much food with me or if it was too less or just right, and where potential weight savings could be achieved. For me on this trip, I carry a few luxury items with me, like my woolen camp shoes, an extra piece of Z Lite as camp seat, a nice piece of cheese and reindeer ham and a book. I could save some weight by taking a lighter headlamp, leave the Nalgene at home and make a cozy for the Platy, combine sleeping system with camp gear, but I'd need a VBL suit for that and as I don't have one yet that's currently not an option. And I am expecting temperatures of -14°C so I'd rather have a good, warm sleeping bag with me, and sufficient isolation to the ground.
I hope this gave you some ideas on how to weigh and list your gear before you go around shopping for new equipment. Listing things up with their weight helps you to make informed decisions where the easiest and best weight savings can be made, before going on a shopping spree =)
Packed and ready to hike!