The next installments of interviews with cottages manufacturers, this time with a company who's product lets you take smart and great photos of yourself - TheStickPic.com. Rod Java came out of his secret laboratory to tell us where their company is headed, which none-photographic products we can expect from them in the future and what kind of process it is to start up a cottage manufacturing business. This one is definitely going to make you smile and brighten up your day, so enjoy!
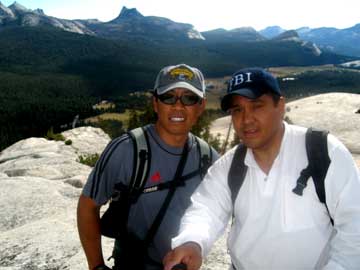
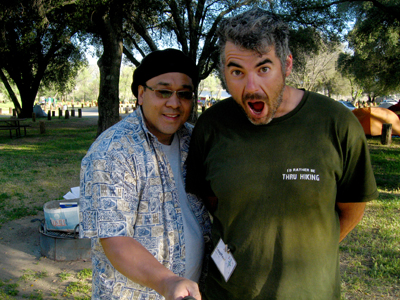
StickPic partners and good hiking friends David Lopez (left) and Rodney Java.
Rod, please briefly introduce yourself and tell us who you are. How often are you out backpacking nowadays?
Hello. I’m Rod Java, the kooky inventor of the StickPic. My good friend and hiking partner, David Lopez, and I are business partners and came up with the name, "TheStickPic.com". I should also mention that behind every great husband entrepreneur is a great wife. And behind me is my wife Sylvia. For all those single ladies out there, David is single too! While David handles all the books, I stay hidden deep down in my secret laboratory inventing new hiking gadgets.
Since when are you backpacking, and how did you start?
I’m a self taught backpacker. My parents emigrated from the Philippines in 1950 and never ventured into the wilderness. I’m sure it was their fear of all the lions, tigers and bears that would eat you up once you stepped into the forest. I, on the other hand, grew up street wise and knew better. There are no lions or tigers in California, only bears like Yogi Bear in the cartoons. And nobody should be afraid of Yogi Bear, right? Anyway, I’ve been hiking in the California Sierras since 1974.
How often are you out backpacking nowadays?
Since I’m also a Sierra Club backpack section leader, I hike about 30 days each year. It’s great that I can claim every trip as a business expense since I am always asked to demonstrate and explain the StickPic to everybody that sees me using it.
Are you a lightweight/ UL backpacker? If so, what is your typical baseweight?
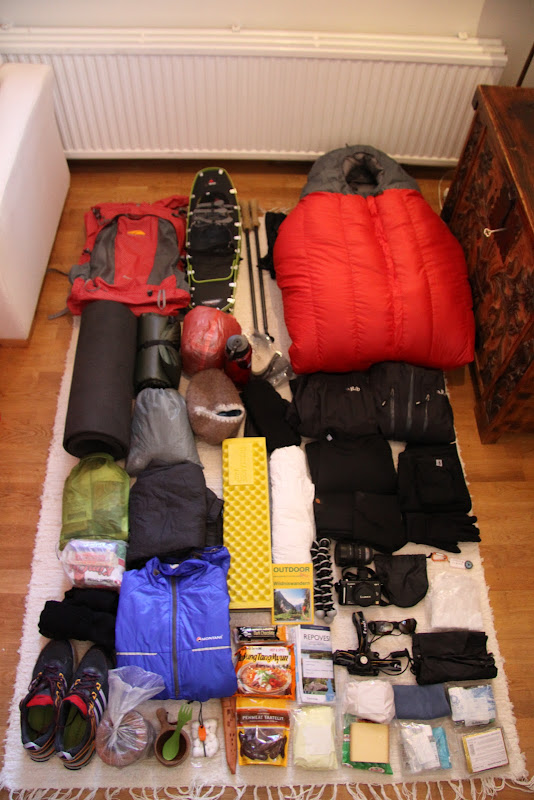
In 1974 I definitely started out “old school” wearing Levi pants, bulky construction boots, and a 60 pound backpack. These days, I have adopted the Ultra Lightweight philosophy and lifestyle. Because I hike primarily in areas where a bear canister is required, my base weight is a little different from others. For most hikes I can get below 15 pounds base weight including an Expedition size Bearikade bear canister.
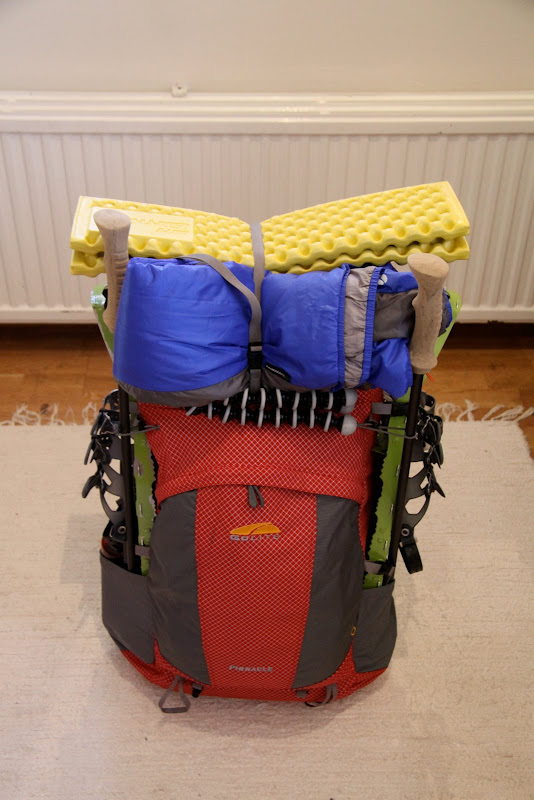
I can get my weight down low because I make my own custom external framed backpack frames from carbon fiber and have a unique way to carry all my gear without a traditional pack bag. It’s a concept I invented which I'm always developing.
TheStickPic.com makes the very innovative Stick Pic, which is now in its second reincarnation and is a perfect way to photograph yourself in a decent manner. Can you tell us how you came up with the idea, how you went about manufacturing it, and decided to start the company?
This is a great question. Since I like to hike solo, it was a no brainer to come up with the StickPic idea. On most of my early solo hikes, I would snap lot pictures of all the beautiful sights I came across. When I would show them to my friends, they would all ask questions like, “Where are you in the picture?” or, “OK, Rod, sure you made it to the top of Mt Whitney……How about showing me some proof???? Like a picture of you on top of Mt. Whitney!” As you can tell from the questions, some of my friends like to kid around with me.
Since my arms are too short to take a good self portrait, I thought, “There has to be a better way!” This is when the light bulb on top of my head can be seen. What if I attached my camera to the end of my trekking pole, set the timer and take a self portrait? Would it work? Will my camera come off and fall off down a 13,000 foot mountain? Will I look weird if somebody saw me doing this? Will my friends believe me now, even if I have proof?
Needless to say, I took all those chances and followed my heart. I was ridiculed by many a hiker. I would hear them say, “It will never work!”...“You look very silly doing that!”... “You are wasting your time!”... “The world is flat and you will sail over the edge!”...
Really, I never did hear those things. But those were some of the things going through my head at the time. I actually was given a lot of support and encouragement from everybody to pursue my dream of making a better life for solo backpackers.
Since I am a home shop machinist, I have a complete machine shop in my garage and was able to experiment with many different materials and designs. I initially made all the StickPics one by one then decided to contract the work to a small machine shop. This way all the StickPics were made with consistent results.
From the moment my first prototype was tested in the Sierras, hikers wanted to know where I got it and where they can buy one too. My thoughts were, “You mean you want to pay me to make you one?”
Now I have to admit, that when David and I decided to make a business of selling the StickPic, I was dreaming of driving a new car, buying a new home, a boat, and finally able to afford the unobtainable Gossamer Gear Lightrex trekking poles. But first I had to enlist the help of the most credible, honest, reliable, believable, dependable people on the face of this planet; the PCT thru hiker. It’s the Pacific Crest Trail thru hiker who will examine every piece of gear in their pack, count every gram and only take what is required to survive and live on the trail for the next 5 to 6 months.
Just a few weeks before the ADZPCTKO in April 2008, I contacted the organizers of this great event for their permission to give away, that’s right, give away our first prototype of the StickPic to every single 2008 PCT thru hiker who was brave enough to want and try one out. In exchange for the free StickPic we only asked for their honest feedback, comments, and suggestions to make the StickPic better. We made a promise to listen to what they had to say and act on their feedback.
In 2008, 150 thru hikers started their 2600 mile journey with our beta StickPic in their pockets. We kept our fingers and toes crossed for weeks and months hoping that these thru hikers would keep their promise and contact us with their honest comments. And without a doubt the comments and suggestions came trickling in. And as promised, we took their comments and suggestions seriously and immediately began a series of improvements based on their suggestions. In 2009 we were invited back to the ADZPCTKO as official vendors and sold a whole bunch more StickPics to the '09 thru hikers.
Rod demonstrating and giving away the first prototype StickPic to all 2008 PCT thru hikers.
We continued to make improvements throughout 2009 and now in 2010, we have what we think is the final version of the StickPic. Our eternal gratitude goes out to the organizers of the ADZPCTKO who gave us our chance as a cottage industry gear manufacturer and to the hundreds of PCT thru hikers who helped us out.
Rod, we love to be let in on the work-in-progress stuff! Can you let us know if you're working on any new products or a new version of the Stick Pic at the moment?
As far as the StickPic, we want to get the StickPic used on top of the highest peaks in the world. That includes Mt. Everest! We are currently working with a few high altitude mountain climbers who will test the StickPic in severe snow conditions and let us know how we can develop a StickPic for these conditions. If you know of anybody that can also help us out, please put them in contact with us. We would love to work with them too. Besides a free StickPic, they can claim to be the first ever to take a StickPic self portrait on top of the world!
I personally, have 2 projects that I am working on which will someday be sold at our website. The first is my revolutionary method of carrying all my gear without a bag and while strapping a bear canister on my back. Secondly, is a retractable sun/snow/rain shade that attaches to my custom external pack frames which I named the SierraShade. I also am working on a universal SierraShade that will easily adapt to most internal framed packs.
If you ever hiked in the desert when the temperatures are above 110 degrees or hiked above tree line where there is no shade in sight, you will know why I invented the SierraShade aka SaharaShade. Maybe later in the year I can share with you and your readers more about these projects.
What is the most sold Stick Pic, version one or two? Also, where do your customer come from?
Our #2 StickPic is our best seller because it fits 75% of all trekking poles including all Leki sticks. The #3 & #5 StickPics fit the popular Black Diamond sticks and is our 2nd most sold model number. We are fortunate to have customers from all around the world including, Japan, Australia, New Zealand, Canada, UK, Germany, France, Sweden, Switzerland and of course Finland.
Are you in touch with other cottage manufacturers in Europe, the USA, Canada or other places?
Becoming a small cottage manufacturer is a very slow process. You first have to work real hard to develop a great product then work even harder to make sure all your customers are happy with the product and customer service.
Once this is accomplished, your customers will start talking positively about you and your product and the good word starts to spread like wildfire on the internet. This is when other cottage manufacturers will notice you and respect you for your efforts. You then have to establish yourself as somebody who is going to be around for a while rather than open and close, fly by night operation.
I don’t mean to be a name dropper, but it’s taken almost 3 years before I could rub shoulders with the great cottage pioneers like Glen Van Peski from Gossamer Gear, Brian Frankle from ULA and Lee, Rand and Russ from Trail Designs.
As the StickPic becomes a more familiar name on the trail and in the outdoor industry, we plan to align ourselves with more cottage industry manufactures. But for now, we like to take it slow and one step at a time.
What is your own favorite backpack, sleep system, shelter and camera? Any other favourite piece of gear which you always carry with you?
If I’m not using my custom made external frame setup, I like to use my Golite Jam pack. I hope to one day have a Gossamer Gear Gorilla pack or a ULA Circuit pack. All of which will have my SierraShade mounted to them!
As far as shelters, I have a few tents, but I always seem to take my Big Agness UL Seedhouse 2 on most trips. I know, I know, it’s not ultra light. At 3 pounds, it’s the lightest 2 person, free standing tent that I know is bombproof. I have been in extreme rain and wind conditions and this tent never failed me. I like to keep all my gear inside my tent at night and enjoy the extra space in my tent when stuck in the tent for 10-12 hour straight.
My favorite compact camera is the Samsung DualView TL225 12.2 MP digital camera. It’s perfect for taking shots with the StickPic because it has a viewfinder in the front as well as in the back of the camera. I wish I invented this camera! One of my favorite pieces of gear is the AuqaStar Plus UV water treatment device. I had to modify it to suit my needs by drilling a hole in the bottle and inserting a short water tube with a bite valve at the end. This way I don’t have to remove the UV element every time I need to take a drink as the manufacturer recommends. In my opinion this is a fault in their design. This is a great lightweight water filter if you know how to use it correctly.
When and where was your last longer backpacking trip, and what was your baseweight? Are you planning to get out for a trip soon, and enjoy the winter/ spring season?
My longest trip was in 2006 when I solo hiked the JMT southbound in 15 days. My step off weight, including water and food for 9 days, was only 28 pounds. This included my 3 pound Berikade Expedition model bear canister. In the Summer of 2010 I hope to again hike the JMT, but this time Northbound. This all depends if I have been good around the house and my wife gives me her blessing. Only the married guys out there will know what I’m talking about.
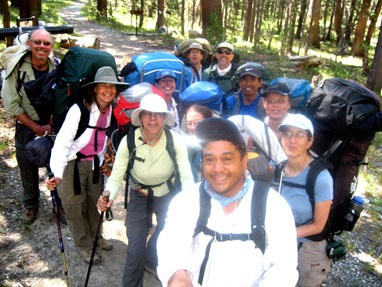
Rod taking a group shot on a Sierra Club backpacking trip.
Do you think ultralight backpacking will become more popular and break into the mass market, or will it continue to be something for a small group of people?
I recently noticed at many of the outdoor stores, that the really large packs of 6000 – 7000 ci are rarely sold. More common are the smaller packs around 3000-4000 ci. So I think the big companies like Northface, REI, Gregory and Osprey realize that backpacking with a 60 pound pack is a thing of the past and want to align their other lightweight products like tents and sleeping bags with their lightweight packs. This is only my theory and I’m sticking to it.
Rod, I thank you for taking the time to answer my questions. Is there something you would like to add?
I just want mention how honored I am to be considered worthy of your time for this interview. It tells me that we are heading in the right direction as far as developing a product that works and is considered a valuable piece of gear for many hikers. It also shows me that the way we treat our customers is really paying off. Thank you again for this wonderful experience and have a great day!
StickPic partners and good hiking friends David Lopez (left) and Rodney Java.
Rod, please briefly introduce yourself and tell us who you are. How often are you out backpacking nowadays?
Hello. I’m Rod Java, the kooky inventor of the StickPic. My good friend and hiking partner, David Lopez, and I are business partners and came up with the name, "TheStickPic.com". I should also mention that behind every great husband entrepreneur is a great wife. And behind me is my wife Sylvia. For all those single ladies out there, David is single too! While David handles all the books, I stay hidden deep down in my secret laboratory inventing new hiking gadgets.
Since when are you backpacking, and how did you start?
I’m a self taught backpacker. My parents emigrated from the Philippines in 1950 and never ventured into the wilderness. I’m sure it was their fear of all the lions, tigers and bears that would eat you up once you stepped into the forest. I, on the other hand, grew up street wise and knew better. There are no lions or tigers in California, only bears like Yogi Bear in the cartoons. And nobody should be afraid of Yogi Bear, right? Anyway, I’ve been hiking in the California Sierras since 1974.
How often are you out backpacking nowadays?
Since I’m also a Sierra Club backpack section leader, I hike about 30 days each year. It’s great that I can claim every trip as a business expense since I am always asked to demonstrate and explain the StickPic to everybody that sees me using it.
Are you a lightweight/ UL backpacker? If so, what is your typical baseweight?
In 1974 I definitely started out “old school” wearing Levi pants, bulky construction boots, and a 60 pound backpack. These days, I have adopted the Ultra Lightweight philosophy and lifestyle. Because I hike primarily in areas where a bear canister is required, my base weight is a little different from others. For most hikes I can get below 15 pounds base weight including an Expedition size Bearikade bear canister.
I can get my weight down low because I make my own custom external framed backpack frames from carbon fiber and have a unique way to carry all my gear without a traditional pack bag. It’s a concept I invented which I'm always developing.
TheStickPic.com makes the very innovative Stick Pic, which is now in its second reincarnation and is a perfect way to photograph yourself in a decent manner. Can you tell us how you came up with the idea, how you went about manufacturing it, and decided to start the company?
This is a great question. Since I like to hike solo, it was a no brainer to come up with the StickPic idea. On most of my early solo hikes, I would snap lot pictures of all the beautiful sights I came across. When I would show them to my friends, they would all ask questions like, “Where are you in the picture?” or, “OK, Rod, sure you made it to the top of Mt Whitney……How about showing me some proof???? Like a picture of you on top of Mt. Whitney!” As you can tell from the questions, some of my friends like to kid around with me.
Since my arms are too short to take a good self portrait, I thought, “There has to be a better way!” This is when the light bulb on top of my head can be seen. What if I attached my camera to the end of my trekking pole, set the timer and take a self portrait? Would it work? Will my camera come off and fall off down a 13,000 foot mountain? Will I look weird if somebody saw me doing this? Will my friends believe me now, even if I have proof?
Needless to say, I took all those chances and followed my heart. I was ridiculed by many a hiker. I would hear them say, “It will never work!”...“You look very silly doing that!”... “You are wasting your time!”... “The world is flat and you will sail over the edge!”...
Really, I never did hear those things. But those were some of the things going through my head at the time. I actually was given a lot of support and encouragement from everybody to pursue my dream of making a better life for solo backpackers.
Since I am a home shop machinist, I have a complete machine shop in my garage and was able to experiment with many different materials and designs. I initially made all the StickPics one by one then decided to contract the work to a small machine shop. This way all the StickPics were made with consistent results.
From the moment my first prototype was tested in the Sierras, hikers wanted to know where I got it and where they can buy one too. My thoughts were, “You mean you want to pay me to make you one?”
Now I have to admit, that when David and I decided to make a business of selling the StickPic, I was dreaming of driving a new car, buying a new home, a boat, and finally able to afford the unobtainable Gossamer Gear Lightrex trekking poles. But first I had to enlist the help of the most credible, honest, reliable, believable, dependable people on the face of this planet; the PCT thru hiker. It’s the Pacific Crest Trail thru hiker who will examine every piece of gear in their pack, count every gram and only take what is required to survive and live on the trail for the next 5 to 6 months.
Just a few weeks before the ADZPCTKO in April 2008, I contacted the organizers of this great event for their permission to give away, that’s right, give away our first prototype of the StickPic to every single 2008 PCT thru hiker who was brave enough to want and try one out. In exchange for the free StickPic we only asked for their honest feedback, comments, and suggestions to make the StickPic better. We made a promise to listen to what they had to say and act on their feedback.
In 2008, 150 thru hikers started their 2600 mile journey with our beta StickPic in their pockets. We kept our fingers and toes crossed for weeks and months hoping that these thru hikers would keep their promise and contact us with their honest comments. And without a doubt the comments and suggestions came trickling in. And as promised, we took their comments and suggestions seriously and immediately began a series of improvements based on their suggestions. In 2009 we were invited back to the ADZPCTKO as official vendors and sold a whole bunch more StickPics to the '09 thru hikers.
Rod demonstrating and giving away the first prototype StickPic to all 2008 PCT thru hikers.
We continued to make improvements throughout 2009 and now in 2010, we have what we think is the final version of the StickPic. Our eternal gratitude goes out to the organizers of the ADZPCTKO who gave us our chance as a cottage industry gear manufacturer and to the hundreds of PCT thru hikers who helped us out.
Rod, we love to be let in on the work-in-progress stuff! Can you let us know if you're working on any new products or a new version of the Stick Pic at the moment?
As far as the StickPic, we want to get the StickPic used on top of the highest peaks in the world. That includes Mt. Everest! We are currently working with a few high altitude mountain climbers who will test the StickPic in severe snow conditions and let us know how we can develop a StickPic for these conditions. If you know of anybody that can also help us out, please put them in contact with us. We would love to work with them too. Besides a free StickPic, they can claim to be the first ever to take a StickPic self portrait on top of the world!
I personally, have 2 projects that I am working on which will someday be sold at our website. The first is my revolutionary method of carrying all my gear without a bag and while strapping a bear canister on my back. Secondly, is a retractable sun/snow/rain shade that attaches to my custom external pack frames which I named the SierraShade. I also am working on a universal SierraShade that will easily adapt to most internal framed packs.
If you ever hiked in the desert when the temperatures are above 110 degrees or hiked above tree line where there is no shade in sight, you will know why I invented the SierraShade aka SaharaShade. Maybe later in the year I can share with you and your readers more about these projects.
What is the most sold Stick Pic, version one or two? Also, where do your customer come from?
Our #2 StickPic is our best seller because it fits 75% of all trekking poles including all Leki sticks. The #3 & #5 StickPics fit the popular Black Diamond sticks and is our 2nd most sold model number. We are fortunate to have customers from all around the world including, Japan, Australia, New Zealand, Canada, UK, Germany, France, Sweden, Switzerland and of course Finland.
Are you in touch with other cottage manufacturers in Europe, the USA, Canada or other places?
Becoming a small cottage manufacturer is a very slow process. You first have to work real hard to develop a great product then work even harder to make sure all your customers are happy with the product and customer service.
Once this is accomplished, your customers will start talking positively about you and your product and the good word starts to spread like wildfire on the internet. This is when other cottage manufacturers will notice you and respect you for your efforts. You then have to establish yourself as somebody who is going to be around for a while rather than open and close, fly by night operation.
I don’t mean to be a name dropper, but it’s taken almost 3 years before I could rub shoulders with the great cottage pioneers like Glen Van Peski from Gossamer Gear, Brian Frankle from ULA and Lee, Rand and Russ from Trail Designs.
As the StickPic becomes a more familiar name on the trail and in the outdoor industry, we plan to align ourselves with more cottage industry manufactures. But for now, we like to take it slow and one step at a time.
What is your own favorite backpack, sleep system, shelter and camera? Any other favourite piece of gear which you always carry with you?
If I’m not using my custom made external frame setup, I like to use my Golite Jam pack. I hope to one day have a Gossamer Gear Gorilla pack or a ULA Circuit pack. All of which will have my SierraShade mounted to them!
As far as shelters, I have a few tents, but I always seem to take my Big Agness UL Seedhouse 2 on most trips. I know, I know, it’s not ultra light. At 3 pounds, it’s the lightest 2 person, free standing tent that I know is bombproof. I have been in extreme rain and wind conditions and this tent never failed me. I like to keep all my gear inside my tent at night and enjoy the extra space in my tent when stuck in the tent for 10-12 hour straight.
My favorite compact camera is the Samsung DualView TL225 12.2 MP digital camera. It’s perfect for taking shots with the StickPic because it has a viewfinder in the front as well as in the back of the camera. I wish I invented this camera! One of my favorite pieces of gear is the AuqaStar Plus UV water treatment device. I had to modify it to suit my needs by drilling a hole in the bottle and inserting a short water tube with a bite valve at the end. This way I don’t have to remove the UV element every time I need to take a drink as the manufacturer recommends. In my opinion this is a fault in their design. This is a great lightweight water filter if you know how to use it correctly.
When and where was your last longer backpacking trip, and what was your baseweight? Are you planning to get out for a trip soon, and enjoy the winter/ spring season?
My longest trip was in 2006 when I solo hiked the JMT southbound in 15 days. My step off weight, including water and food for 9 days, was only 28 pounds. This included my 3 pound Berikade Expedition model bear canister. In the Summer of 2010 I hope to again hike the JMT, but this time Northbound. This all depends if I have been good around the house and my wife gives me her blessing. Only the married guys out there will know what I’m talking about.
Rod taking a group shot on a Sierra Club backpacking trip.
Do you think ultralight backpacking will become more popular and break into the mass market, or will it continue to be something for a small group of people?
I recently noticed at many of the outdoor stores, that the really large packs of 6000 – 7000 ci are rarely sold. More common are the smaller packs around 3000-4000 ci. So I think the big companies like Northface, REI, Gregory and Osprey realize that backpacking with a 60 pound pack is a thing of the past and want to align their other lightweight products like tents and sleeping bags with their lightweight packs. This is only my theory and I’m sticking to it.
Rod, I thank you for taking the time to answer my questions. Is there something you would like to add?
I just want mention how honored I am to be considered worthy of your time for this interview. It tells me that we are heading in the right direction as far as developing a product that works and is considered a valuable piece of gear for many hikers. It also shows me that the way we treat our customers is really paying off. Thank you again for this wonderful experience and have a great day!