I hear you, dear reader: "Why does that bloody bloke not yet write an review about the Tarptent Scarp 1 - he has it nearly one and half weeks!?" Well, I simply didn't yet have time to sleep in it - "Excuses, excuses!" I hear you say. Yes yes, though this weekend, hopefully, I will be able to take it out for a night or two, and then in September for a bit more. But until then, read on about my initial views on the Scarp 1 from Tarptent! "About bloody time!"
James wants one, Martin has one, Dave even would get one and Chris is testing one already since a long time. Yes, I am talking about the Scarp 1 from Henry Shires Tarptent. I got mine one and half weeks ago, and have had the chance to put it up already twice, to take some photos and convince myself of the fine craftsmanship that went into this tent.
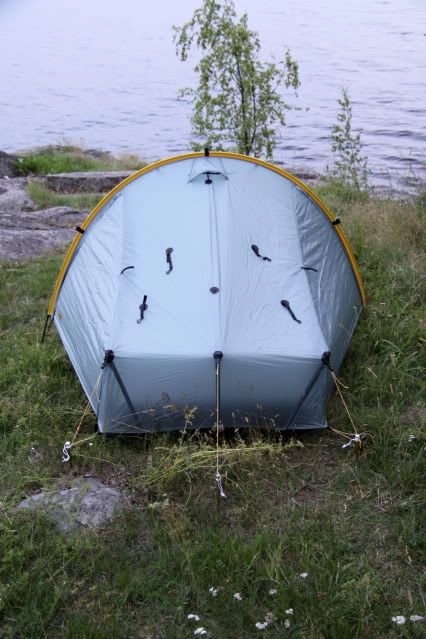
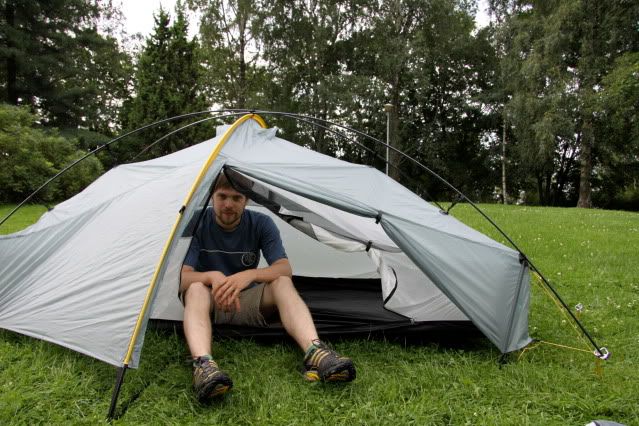
Let me start with the reasons why I wanted this tent. I love the design: two entries, two vestibules, a large interior in which I can sit comfortably in, four season capable and storm worthy. Ah ja, there's also the low weight - mine is 1347g light, and that includes the stuff sacks, eight stakes and the pole. I also have the extra crossing poles which weigh in at 342g, and the Tyvek ground sheet which is 111g.
The crossing poles give me flexibility, which I really value. I could for example decide to just take the inner on a hot summer night, if I know its not going to rain but want protection from insects. In the autumn and spring, when there's no insects around, I can just take the fly and the ground sheet and have a tarp-like tent. And in the winter I take the crossing poles with me and should be able to take whatever the weather gods decide to throw at me.
Putting it up is easy, the first time I put it up I needed eight minutes, the second time six so I guess the next time I can get that down to four and then start to aim for the two minutes with which Tarptent advertises it. You need six stakes, though I carry eight with me and some extra guyline in case its extremely windy or that I lose one. The free-standing option with the crossing poles is great if you're in the hills and can't find a spot where to stake out the tent - very handy for the Fjells in Lapland.
Another reason for me getting the Scarp 1 was that I like to support the cottage industry if I can. My backpack was made in a garage in Utah, my stove in Canada and my tent was made in Seattle. I know where my money went, and I can contact the owner of the company directly if I have a question. That is something I value. Finally, the tent was cheap if I compare it to other tents with its capabilities. For a Hilleberg or a Terra Nova tent I easily would have paid double of what I paid now.
Finally, if you're talking about the Scarp 1 you can't finish without mentioning Franco. I consider Franco an expert on tents, and he has the Scarp 1 already quite a while and was able to play around with it extensively. He has a variety of very useful articles published on the BPL.com forum, and here are his Scarp 1 articles in one spot - Enjoy!
Storing the Scarp 1
How strong is the Scarp 1?
MYOG Scarp 1 wind curtain
Scarp 1 for two people
Tarptent Kocheda - a Scarp 1 mod (Franco doesn't recommend this mod anymore because of possible friction of the crossing poles with the fly, but I included it for completion's sake)
A big "Thank You!" goes to Franco who gave me permission to link to his articles.
I'm looking forward to take it out into the hills and forests and spend some time sleeping and living in it. Until then I hope you found my initial review useful, and if you got questions, comments or observations - leave a comment!

James wants one, Martin has one, Dave even would get one and Chris is testing one already since a long time. Yes, I am talking about the Scarp 1 from Henry Shires Tarptent. I got mine one and half weeks ago, and have had the chance to put it up already twice, to take some photos and convince myself of the fine craftsmanship that went into this tent.
Let me start with the reasons why I wanted this tent. I love the design: two entries, two vestibules, a large interior in which I can sit comfortably in, four season capable and storm worthy. Ah ja, there's also the low weight - mine is 1347g light, and that includes the stuff sacks, eight stakes and the pole. I also have the extra crossing poles which weigh in at 342g, and the Tyvek ground sheet which is 111g.
The crossing poles give me flexibility, which I really value. I could for example decide to just take the inner on a hot summer night, if I know its not going to rain but want protection from insects. In the autumn and spring, when there's no insects around, I can just take the fly and the ground sheet and have a tarp-like tent. And in the winter I take the crossing poles with me and should be able to take whatever the weather gods decide to throw at me.
Putting it up is easy, the first time I put it up I needed eight minutes, the second time six so I guess the next time I can get that down to four and then start to aim for the two minutes with which Tarptent advertises it. You need six stakes, though I carry eight with me and some extra guyline in case its extremely windy or that I lose one. The free-standing option with the crossing poles is great if you're in the hills and can't find a spot where to stake out the tent - very handy for the Fjells in Lapland.
Another reason for me getting the Scarp 1 was that I like to support the cottage industry if I can. My backpack was made in a garage in Utah, my stove in Canada and my tent was made in Seattle. I know where my money went, and I can contact the owner of the company directly if I have a question. That is something I value. Finally, the tent was cheap if I compare it to other tents with its capabilities. For a Hilleberg or a Terra Nova tent I easily would have paid double of what I paid now.

Finally, if you're talking about the Scarp 1 you can't finish without mentioning Franco. I consider Franco an expert on tents, and he has the Scarp 1 already quite a while and was able to play around with it extensively. He has a variety of very useful articles published on the BPL.com forum, and here are his Scarp 1 articles in one spot - Enjoy!
Storing the Scarp 1
How strong is the Scarp 1?
MYOG Scarp 1 wind curtain
Scarp 1 for two people
Tarptent Kocheda - a Scarp 1 mod (Franco doesn't recommend this mod anymore because of possible friction of the crossing poles with the fly, but I included it for completion's sake)
A big "Thank You!" goes to Franco who gave me permission to link to his articles.

I'm looking forward to take it out into the hills and forests and spend some time sleeping and living in it. Until then I hope you found my initial review useful, and if you got questions, comments or observations - leave a comment!


